For the last week of this mini- session, we explored drawing and watercolor painting. The 2s classes began with a still life of an aloe plant. I wanted to introduce the children to the concept of drawing an object that they can see in front of them, but I also wanted to find something that was fairly simple in form. I chose the aloe plant because it is made up of mostly simple lines.

I encouraged the children to touch the plant and look at the shape/lines of the plant before drawing.

Then I offered the children black Sharpie markers (calling them "special grown-up markers") to try to draw the aloe plant. I'm not sure if any of the children really understood the concept of drawing the plant (some of the children thought I meant to draw
on the plant) , but it was still a fun exercise to get them used to the idea.

For the 1s class, I offered the children oil pastels and encouraged them to make marks on the paper.


After our drawing sessions, I brought out a tray and liquid watercolor paints for each child. The oil pastels and sharpie markers will show through the watercolor to create a "resist" painting.


After a little while of painting with brushes, I brought out eye-droppers to use with the watercolors. They take a little practice before mastering, but once the children figured them out they proved to be very interesting!


To further the exploration of watercolor, I offered the children "bleeding" tissue paper and cups of water to make their own watercolor. When the tissue paper gets wet, it bleeds the color into the water- then the wad of tissue can be used to paint with!


Of course all the children eventually wanted more water, so I gave them their own squeeze bottles- this incited the investigation of mixing colorful water with a variety of materials: glitter, glue, mixing tools, cars, necklaces, etc.


It was really interesting to see how the colors in the water reacted to movement and different materials.


When the children asked for more water, I gave them sponges and showed them how to re-use their water by soaking it up and squeezing it back into a cup or bottle.


The Wednesday class asked to use the spray bottles like the previous week when they "washed" the chair seats.

Soon enough, they were washing the chairs again!

The children also worked at the easels with oil pastels and watercolors.


Towards the end of class, we continued our exploration of watercolor outside. For the 1s class, we spread bleeding tissue paper over white watercolor paper. The children squeezed water onto the tissue paper to see the colors bleed onto the white background.


The 2s classes used spray bottles filled with liquid watercolor to paint the white canvas... among other things!


The batiks are finally dry! Here's one of the finished pieces.


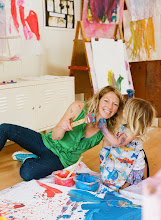
 I first offered the children bowls of paint and encouraged them to scoop the paint onto their glossy finger-paint paper.
 For children who were reluctant to get their fingers into the paint, I gave them a tool (a popsicle stick or small whisk) to jump start their exploration.

 I slowly began to bring out more items to use with the paints that would encourage the kids to get their hands messy- like these mardi-gras beads!
 Shaking glitter from a salt shaker was another exciting addition to the painting experience.
 The children were also invited to move around the studio and investigate the interesting materials on the shelf.
 The 1s class took the opportunity to toddle around and check out the studio, while the 2s class was content getting messy at the table!
 After a while, everyone moved around to work at the easels and the collaborative canvas.


 For the twos group, I introduced bubble wrap prints towards the end of class. The children used foam rollers to cover the bubble wrap with paint, then pressed it (paint side down) onto a piece of paper.
 Another fun use for the bubble wrap was to make "jumping prints" on the ground. The kids used the same rolling paint technique to cover the bubble wrap, placed it onto a piece of paper on the ground, and jumped on the bubble wrap over and over to create a popping sound.
 Then they peeled up the wrap to discover their jumping print!
 All of the messy discoveries eventually led to clean up time in the water table- which is sometimes just as fun as making the mess!



 Posts
Posts


